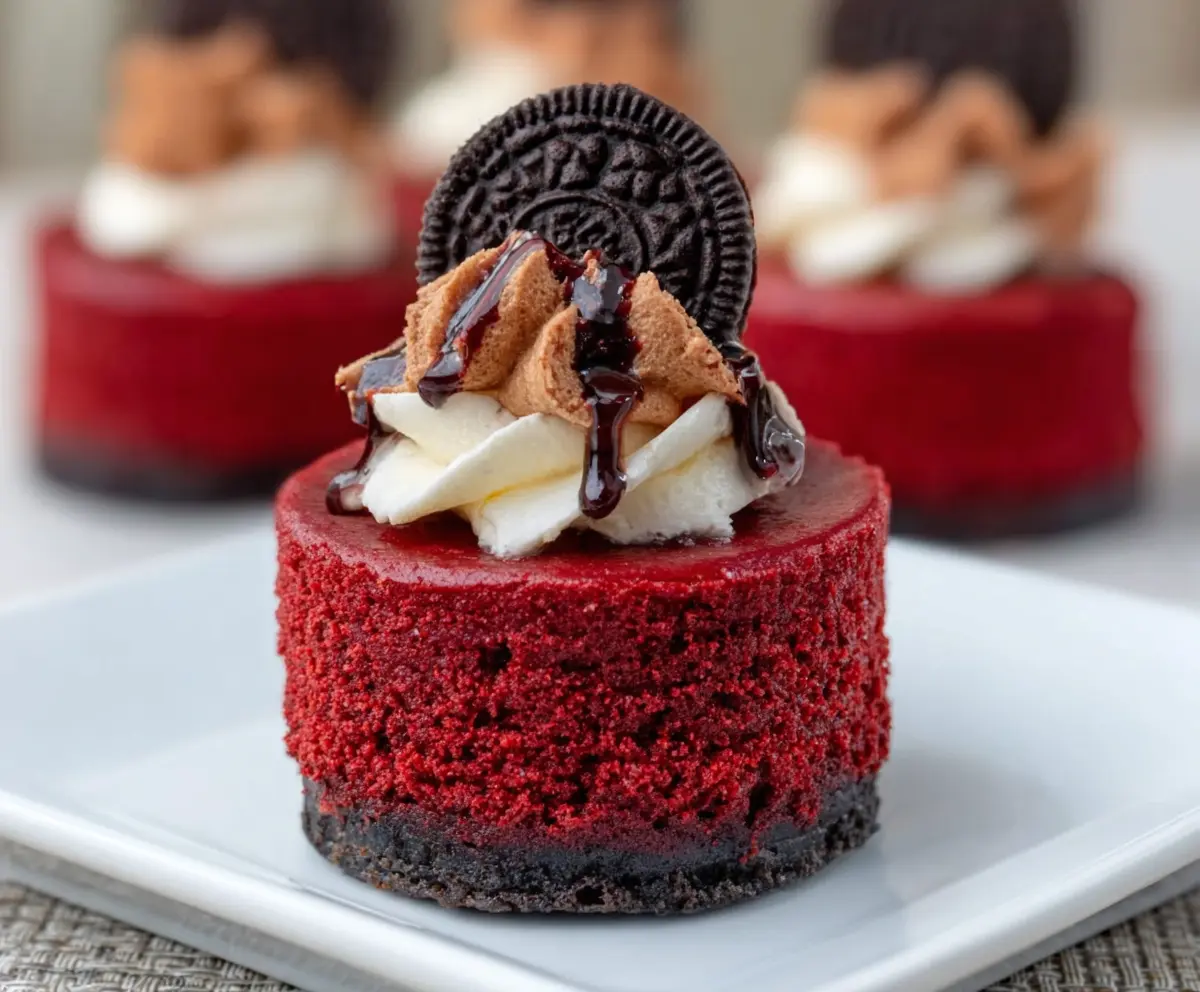
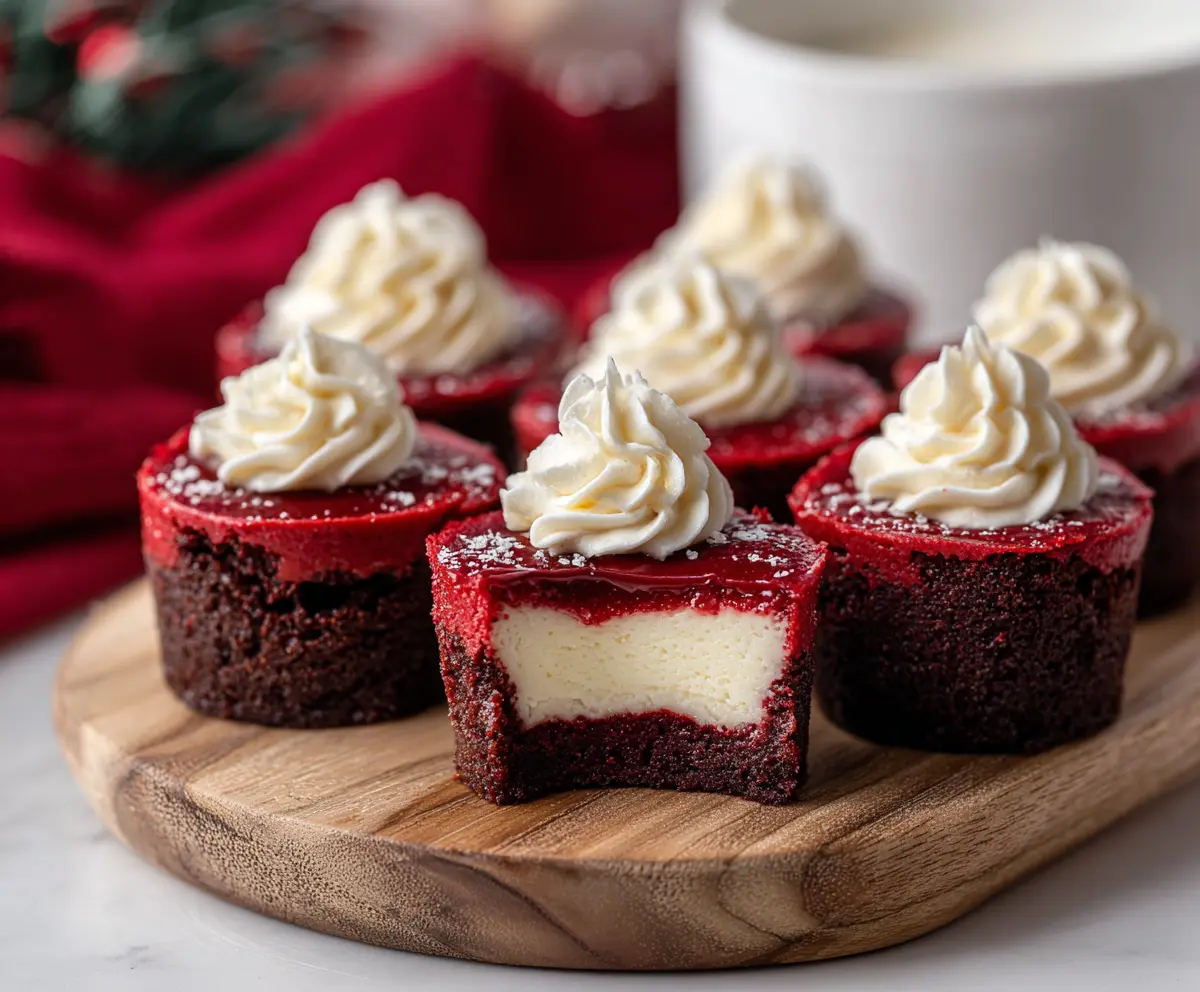
Mini Red Velvet Cheesecakes are a delightful little treat that bring together the rich, creamy texture of cheesecake with the vibrant, slightly chocolatey flavor of red velvet cake. These individual-sized desserts are perfect for when you want something special but just the right amount of sweetness and indulgence. The smooth cheesecake filling contrasts beautifully with the tender red velvet cake base, making each bite a little celebration.
I love making these because they’re perfect for sharing, but also great for treating yourself without going overboard. Plus, baking them in mini sizes means they cook faster and feel extra special when served. Topping them with a bit of cream cheese frosting or a sprinkle of mini chocolate chips takes them to the next level. I find they make any gathering feel a bit more festive!
One of my favorite ways to enjoy Mini Red Velvet Cheesecakes is with a warm cup of coffee or a cozy evening movie night snack. They’re sweet but not too heavy, so they satisfy my dessert cravings without leaving me feeling stuffed. Making these feels like a fun little project, and sharing them always brings smiles around the table.
Key Ingredients & Substitutions
Chocolate sandwich cookies: These form a crunchy, chocolaty crust. Oreos work great, but any similar cookie can be crushed and used. For gluten-free options, try gluten-free chocolate wafers.
Cream cheese: The heart of the cheesecake layer. Make sure it’s softened well for smooth mixing. You can use Neufchatel for lower fat, but texture will be less creamy.
Buttermilk: Adds tang and moisture to the red velvet flavor. If you don’t have buttermilk, mix 6 tbsp milk with 1 tbsp vinegar or lemon juice and let it sit for 5 minutes.
Red food coloring: Gives the classic red velvet look. You can use natural beet juice or powdered beetroot for a natural option, but the color may be softer.
Heavy whipping cream & cream cheese (for topping): Whipping cream makes a fluffy topping. Adding cream cheese makes it richer and gives a slight tang, perfect if you love classic cream cheese frosting flavors.
How Do I Get a Smooth, Crack-Free Mini Cheesecake Filling?
Getting that creamy, smooth filling without cracks can be tricky. Here’s what helps:
- Beat cream cheese well: Make sure it’s softened to room temperature and beat it until very smooth before adding other ingredients.
- Add eggs one at a time: Mix on low speed to prevent air bubbles, which cause cracks.
- Don’t overmix: Once the eggs are incorporated, stop mixing to keep the batter smooth but not overly aerated.
- Bake until just set: The center should still jiggle slightly—overbaking dries it out and causes cracks.
- Cool gently: Let the cheesecakes cool at room temperature before chilling. Sudden temperature changes can cause cracking.
Equipment You’ll Need
- Mini cheesecake pan or muffin tin – I recommend this to give the perfect mini size and shape.
- Mixing bowls – for preparing the crust and filling, making your work easier.
- Electric mixer – helps you beat the cream cheese and whip the topping smoothly and without lumps.
- Spray or paper liners – to keep the cheesecakes from sticking and make them easy to remove.
- Spatula – for gently folding ingredients and smoothing the tops.
- Measuring cups and spoons – for precise ingredient amounts, ensuring the perfect texture and flavor.
- Oven – a standard oven works best for baking these mini cheesecakes evenly.
Flavor Variations & Add-Ins
- White chocolate chips or chunks mixed into the batter add extra sweetness and creaminess—perfect if you love a richer taste.
- Swirl a bit of cream cheese frosting or blueberry jam on top before chilling for a colorful look and added flavor.
- Different toppings like chopped nuts, mini chocolate chips, or sprinkles make each mini cheesecake unique and fun.
- Try swapping the red food coloring for natural options like beet juice for a softer hue or a slightly different flavor profile.
How to Make Mini Red Velvet Cheesecakes
Ingredients You’ll Need:
For the Crust:
- 1 ½ cups crushed chocolate sandwich cookies (like Oreos), finely crushed
- 5 tablespoons unsalted butter, melted
For the Red Velvet Cheesecake Layer:
- 12 oz (340 g) cream cheese, softened
- ½ cup granulated sugar
- 1 teaspoon vanilla extract
- 2 large eggs
- 6 tablespoons buttermilk
- 1 tablespoon cocoa powder
- 1 tablespoon red food coloring
- 1 teaspoon white vinegar
- 1 teaspoon baking soda
- Pinch of salt
For the Topping:
- ½ cup heavy whipping cream
- 2 tablespoons powdered sugar
- 1 teaspoon vanilla extract
- ¼ cup cream cheese, softened (optional, for cream cheese whipped topping)
- Mini chocolate sandwich cookies (like Oreos), halved or whole
- Chocolate syrup or ganache for drizzling
How Much Time Will You Need?
This recipe takes about 20 minutes of prep time and 18-22 minutes of baking time, plus at least 3 hours of chilling time in the fridge (overnight is best). So plan ahead for the chilling, which helps the cheesecakes set perfectly.
Step-by-Step Instructions:
1. Prepare the Crust:
First, preheat your oven to 325°F (165°C). In a medium bowl, mix the crushed chocolate sandwich cookies with melted butter until it looks like wet sand. Press about 2 tablespoons of this mixture firmly into the bottom of each space in a mini cheesecake pan or muffin tin. Set the pan aside for now.
2. Make the Red Velvet Cheesecake Batter:
In a large bowl, beat the softened cream cheese and sugar until smooth and creamy, about 2 minutes. Add the eggs one at a time, mixing on low speed after each addition. Then stir in vanilla extract, buttermilk, and cocoa powder until smooth. Mix in the red food coloring until the batter is a rich red color. In a small bowl, combine the vinegar, baking soda, and salt, then gently fold this mixture into the batter. This helps keep the red velvet texture light and tender.
3. Fill and Bake:
Spoon or pour the cheesecake batter over the crust in each pan cavity, filling about ¾ full. Tap the pan lightly on your counter to release any air bubbles. Bake for 18-22 minutes, or until the centers are set but still a little jiggly. Remove the pan from the oven and let the mini cheesecakes cool to room temperature before chilling them in the refrigerator for at least 3 hours or overnight.
4. Prepare the Whipped Cream Topping:
In a chilled bowl, whip the heavy cream with powdered sugar and vanilla extract until soft peaks form. For extra creaminess and a bit of tang, gently fold in the softened cream cheese, then whip until firm peaks form.
5. Assemble the Mini Cheesecakes:
Carefully take the chilled mini cheesecakes out of the pan. Pipe or spoon the whipped cream topping on top of each one. Place a mini chocolate sandwich cookie on each cheesecake, then drizzle with chocolate syrup or ganache if you like.
6. Serve and Enjoy:
Keep the mini cheesecakes chilled until you’re ready to eat. Enjoy these rich, creamy, and colorful treats—they’re perfect for special occasions or a sweet personal indulgence!
Can I Use Frozen Cream Cheese for This Recipe?
It’s best to use cream cheese that’s fully thawed and softened at room temperature. This helps achieve a smooth batter without lumps. If you only have frozen cream cheese, thaw it overnight in the fridge and then leave it out for about 30 minutes before using.
Can I Make Mini Red Velvet Cheesecakes Ahead of Time?
Yes! These mini cheesecakes actually taste better after chilling overnight because it lets the flavors meld and the texture firm up. Just cover them tightly and keep refrigerated until ready to serve.
How Should I Store Leftovers?
Store leftover mini cheesecakes in an airtight container in the refrigerator for up to 4 days. Avoid freezing as the texture of the cheesecake and whipped topping can change.
Can I Substitute the Red Food Coloring?
You can use natural alternatives like beet juice or powdered beetroot for a more natural red color. Keep in mind, natural colors might give a softer hue and slightly different flavor, but they work well if you prefer to avoid artificial dyes.